![]()
Hydroponics Gardening
![]()
|
Hydroponics is a great hobby - after you understand the principles, you start designing systems with available materials. It is like inventing the wheel over and over and over... |
![]()
I do not have a lot of space to set up a large system so I had to come up
with something that would fit in to a 12 x 4 foot area.
I did not want to have to treat and store a lot of water so I went with a drip
system with several small aerators - the one's that look like small sprinklers.
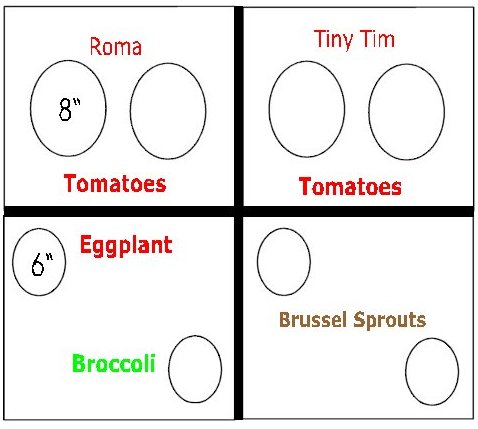
I picked the crops I wanted to grow.
4 - Tomatoes ---------------------------------------- 8" pots
1 - Eggplant ----------------------------------------- 6" pot
2 - Brussel sprouts ---------------------------------- 6" pots
1 - Broccoli ----------------------------------------- 6" pot
All heavy feeders with 6 to 6.5 ph range.
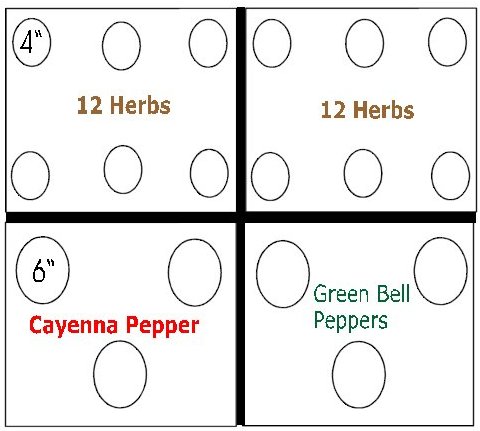
12 - Different herbs ---------------------------------- 4" pots
3 - Cayenne peppers ------------------------------- 6" pots
3 - Bell peppers ------------------------------------ 6" pots
All light feeders with a ph in the 5.5 to 6.0 range.
The system will look something like this.
So I went out and bought some parts to play with.
This design is not meant to be a cheap system but something that looks not bad in the yard.
8 -- 24" x 18" x 8-3/4" rubber maid toot boxes - blue - opaque.
2 -- 25 liter plastic buckets - food grade.
2 -- submersible pumps.
4 -- 8" plastic pots.
26 -- drip sticks.
12 -- 5/8" drain connecters with barbed connection
10 -- 6" plastic pots
12 -- 4" plastic pots
44 -- 1/16" threaded x hose connection/barb
18 -- small sprinkler thingies.
20 -- feet of 1/8" rubber tubing
20 -- feet 1/8" plastic - rigid tubing.
20 -- or 30 feet of 3/4" and 1/2" pex plastic piping.
bag of plastic 1/2" 90degree elbows.
bag of 3/4" 90 degree elbows plastic pex fittings
1/2 dozen 3/4" tees plastic pex.
1/2 dozen 3/4" x 1/2" x 1/2" tees.
1/2 dozen 1/2" plastic pex elbows.
A bunch of Teflon tape and some Vaseline.
A bunch of 2" x 4" stripped down to 1-1/2" x 1-1/2" studs.
![]()
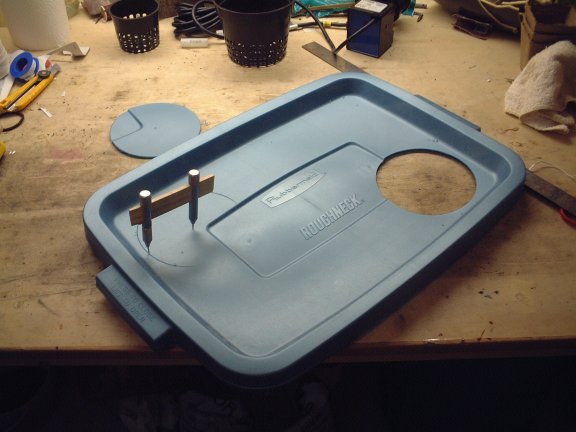
Cutting out the holes in the lids to accommodate the pots and grow media.
|
I thought about using a razor knife, but thought it was going to leave jagged edges, that may rip or tear with weight and heat. I came up with the compass cutter from a tool I purchases to draw 11 foot radius circles for a church window I made. The tool is designed to hold a center point pin and lead that is used for a Schaffer mechanical pencil. The tool fits on a yard stick, but for the church window I milled my own lumber to hold it. I modified it by taking the lead out and replacing it with a finishing nail, sharpened on the end used to score repeatedly the rubber maid lid till it cut 1/2 way through, then it was scored from the other side till it caused the cut out to separate from the lid. The rubber maid material is easy to score like this - but if you try to use a drill, spade bit or hole saw it will fail, and rip the rubber. Test holes after each cut. I give the holes a light sanding to remove any left over from the cut. |
![]()
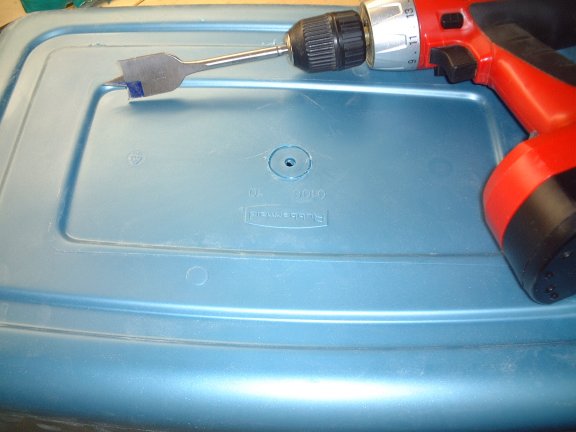
Drilling out for the drain hole.
|
I used a spade bit, the one that has tabs on the outer edge of the bit that cuts in about 1/32" almost the thickness of the material. The thickness is about 1/8" so if you cut a little from the front, then a little from the other side it will produce a perfect hole and not rip the container, setting you back a few bucks. Note: The first cut with the spade bit should be very gentle. |
![]()
Attaching the drain fitting.
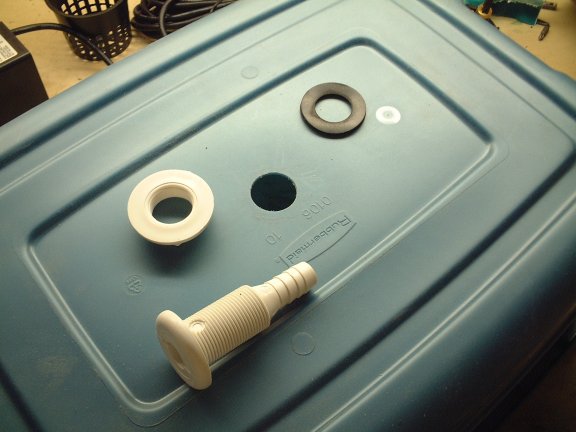 \
\
| This is a very handy fitting - make sure you have 2 rubber
washers per connection - this aids the seal on the curved surface. I apply a little bead of silicon to the surfaces that will come in contact with the inside surfaces, this includes between the washers. On the barbed x thread x flange fitting the threaded spigot. I will place some silicon then add the rubber washer. Use a slot screw driver to push the washer up against the silicone surface gently then the silicon again and the second rubber then attach the drain fitting to the base of the rubber maid container pail. Remember the rubber fittings against the flange go on the inside of the pail so the nut does not turn on the rubber making it hard to get a good seal - this has a draw back of making the amount of water stored much greater |
![]()
Container held in place with 2 x 2-s
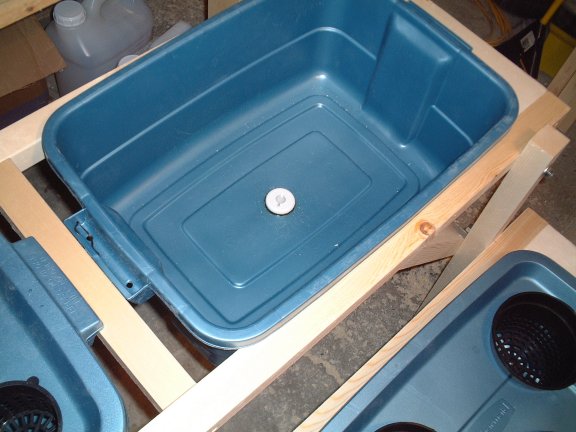
|
I have built 2 racks to hold the 8 rubber maid containers out of the 2 x 4-s ripped in half. I wanted the containers suspended so a little convex action on the bottom surface, to help with drainage - avoid stagnant water. |
![]()
Container support.

| This is what the sections will look like but with more wood covering the skeleton figure and white paint. Add a canopy to protect from hail and to support the solar panels. |
![]()
Piping set up
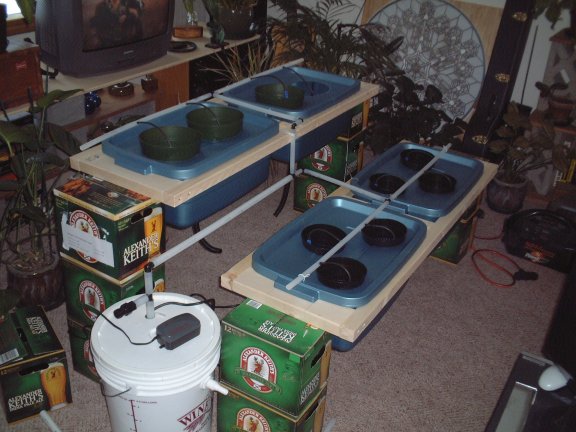
|
This is just a way I like to look at something I am building to get a mechanical view. It is hard to see the piping but the feed is 3/4" pex to a 3/4" x 1/2" x 1/2" tee to a 1/2" 90 degree elbow. So a 3/4" feeding 2 - 1/2" feeds, just for balance. |
![]()
The heart of the system
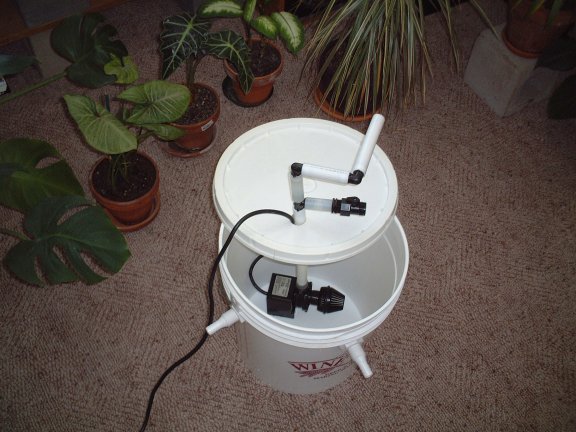
| The pump in an old Wine Kitz primary fomenter, or just call it a 5 gallon bucket... After the plug and 3/4" pex and an air hose is feed through the hole in the lid there is little room for anything else. There is a shut off valve on the riser off the pump I am going to use it for discharging the reservoir. In the yard the is a drop in elevation of at least 4 feet with out setting up a level and transom so sophomoric action should help, I will probably put in a shut off on the feed side to assist flushing . |
![]()
Feeding the growing media.
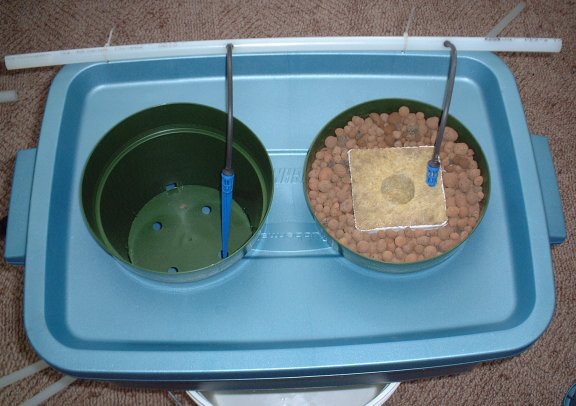
|
The blue steaks are drop controllers. I will be melting more holes in the green pot to encourage root development. On the right you see a 4" cube of rock wool supported by expanded clay pellets. There will be aeration system under the lid. |
![]()
Connecting pex with out crimp rings.
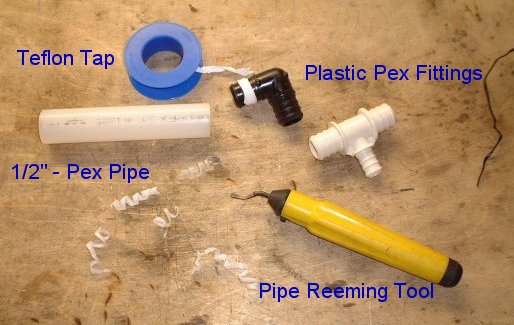
|
Installing the aeration system under the lids in the chamber of the roots, I did not want to use metal - In this system -- there will be no contact of metal to solution period... So I came up with a push fitting using the plastic pex with pex pipe - these are very cheap for me so I use them. First if you put a pex (from now on it is assumed plastic) fitting in to the pipe it is not very snug. So if you want it more snugger...lol... you will need to wrap it with Teflon tape - BUT if you push it in to pex pipe it rips the Teflon tape and the seal is compromised. So - use a means by which to camber or bevel the inside edge of the pex pipe, I use the the yellow reamer. I use the reamer to bevel the inside edge of the pipes to allow the Teflon taped fittings to insert in to the pex pipe with little damage to the seal. A little lubricant is ok like a very very very tiny amount twisted on to the fitting will encourage the seal but very very little is needed...It never hurts to expose the pipe to hot water to make it pliable. |
![]()
Some photos of the garden growing.
Some
photos of the parts and assembly method of the system.
Return to photo and stained glass tutorial pages.
![]()
The system has been moved and the wood frame was not reused
![]()
Do not
forget to visit the Writers Voice
while here.
We have 10,000 stories and poems with over 1,200 writers
And no advertising.
![]()
Critique this work
![]()
Click on the book to leave a comment about this work
![]()